


52
C
B
A
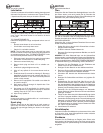
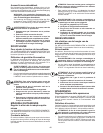
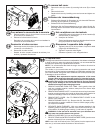
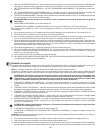
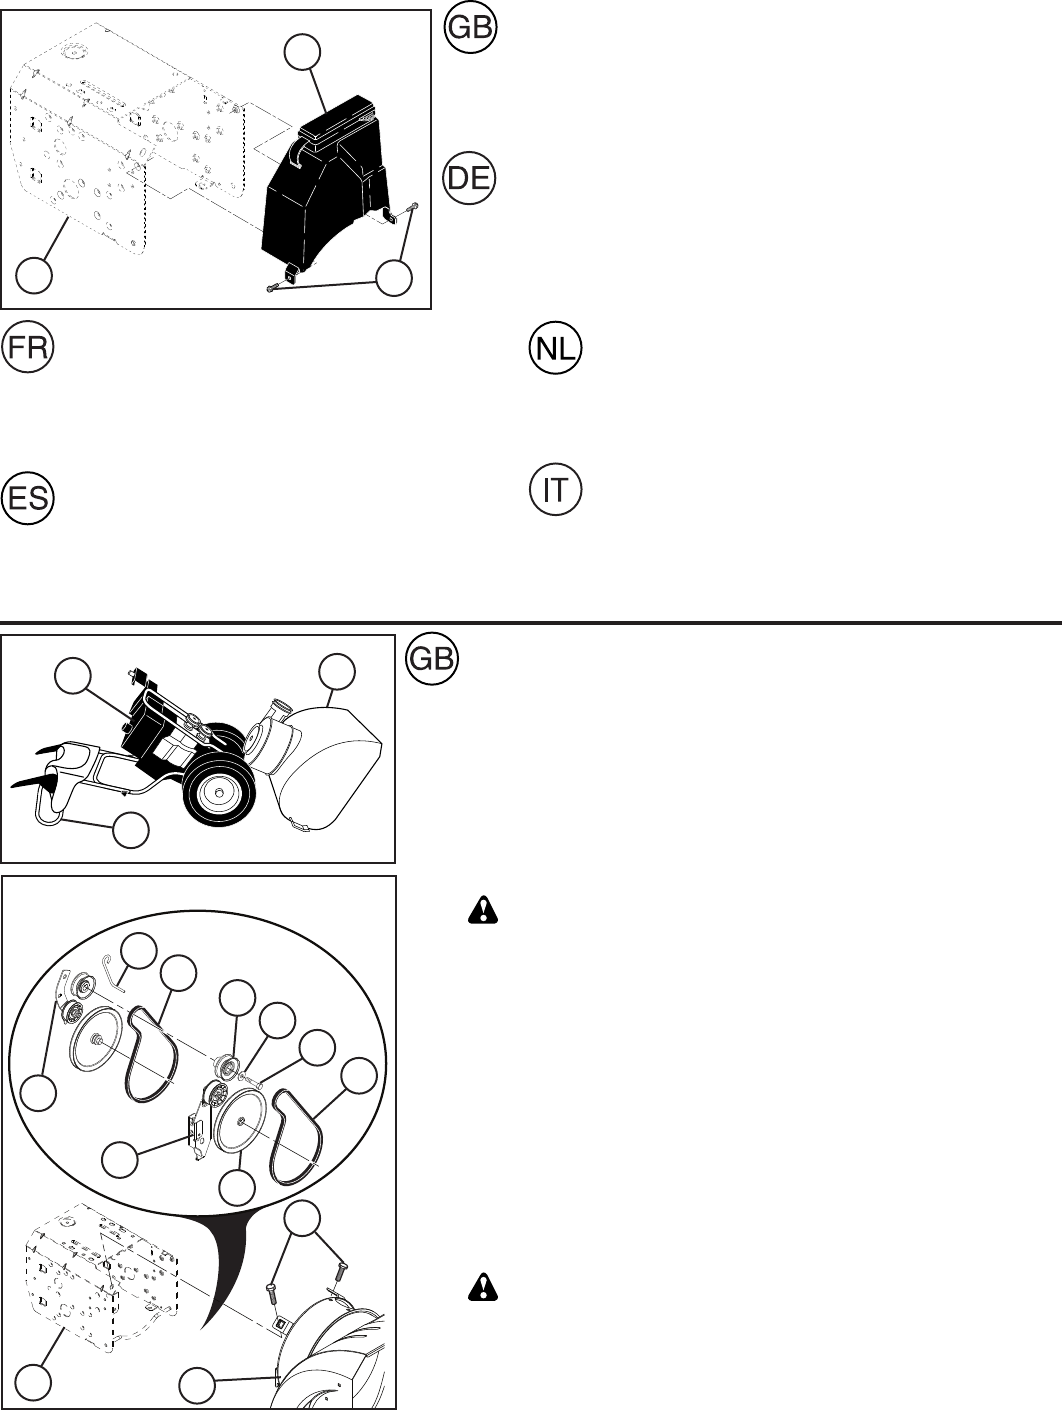
To remove belt cover
1. Remove the two (2) screws (A) securing belt cover (B) to frame
(C).
2. Remove belt cover.
• Replace belt cover by installing cover and screws and tighten se-
cure ly.
Entfernen der riemenabdeckung
1. Entfernen Sie die zwei (2) Schrauben (A), mit denen die Riemena-
beckung (B) am Rahmen (C) befestigt ist.
2. Entfernen Sie die Riemenabdeckung.
• Befestigen Sie die Riemenabdeckung erneut, indem Sie die Ab-
deckung und die Schrauben wieder anbringen und die Schrauben
fest anziehen.
Pour enlever le couvercle de la courroie
1. Enlevez les deux (2) vis (A) en fixant le couvercle de
la courroie (B) au châssis (C).
2. Enlevez le couvercle de la courroie.
• Remplacez le couvercle de la courroie en installant le
couvercle et serrez solidement.
Desmontar el cubre correas
1. Desmontar los dos (2) tornillos (A) que sujetan el cubre
correas (B) a la carcasa (C).
2. Desmontar el cubre correas.
• Sustituir el cubre correas colocando la cubierta y los
tornillos y apretando firmemente.
Het verwijderen van de riemhuls
1. Verwijder de twee (2) schroeven (A) die de riemhuls (B)
aan het frame (C) bevestigen.
2. Verwijder de riemhuls.
• Zet de riemhuls weer terug door de huls en de schroeven
terug te plaatsen en draai stevig aan.
Rimuovere il coperchio della cinghia
1. Togliere le due (2) viti (A) che fissano il coperchio della
cinghia (B) all’intelaiatura (C).
2. Togliere il coperchio della cinghia.
• Rimettere coperchio e viti, stringendo bene.
3
2
1
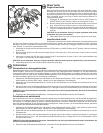
To replace belts
The auger and traction drive belts are not adjustable. If the belts are damaged
or begin to slip from wear, they should be replaced. It is recommended that
the belt(s) be replaced by a qualified service center.
NOTE: It is recommended that both the auger and traction drive belt be
replaced at the same time.
The V-belts on your snow thrower are of special construction and should
be replaced by original equipment manufacturer (OEM) belts available from
your nearest dealer. Using other than OEM belts can cause personal injury
or damage to the snow thrower.
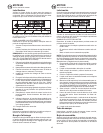
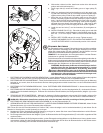
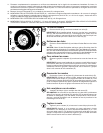
WARNING: Belt replacement requires separation of the snow
thrower. While separating the auger housing (1) from the frame as-
sembly (2), it is important that an assistant stand in the op er at ing
position and hold the snow thrower handles (3). Serious personal
injury and/or damage to the unit could occur if the snow thrower
should fall during the belt chang ing process.
1. REMOVE GASOLINE FROM FUEL TANK - Drain gasoline from fuel
tank into a suitable container, outdoors, away from fire or flame. Wipe
up any spilled gasoline.
2. REMOVE DISCHARGE CHUTE - Loosen lock nut securing chute rotator
head to mounting bracket only enough to allow chute rotator head to be
raised and discharge chute to be removed from snow thrower.
3. REMOVE BELT COVER - See “TO REMOVE BELT COVER” in this
section of this manual.
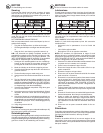
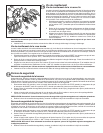
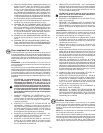
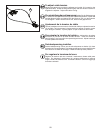
4. REMOVE ENGINE PULLEY (A) - Remove bolt (B), flat washer (D)
securing pulley to engine crankshaft. Remove outside (auger) pulley
(A) only from crankshaft.
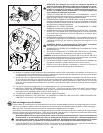
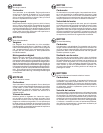
5. SEPARATE SNOW THROWER - With your assistant standing in the
operating position holding the handles, remove the two bolts (F) and
lock washers (G) holding auger housing (1) and frame (2) together.
WARNING: As the last bolt is removed, have your assistant care-
ful ly lower the handles down to the ground.
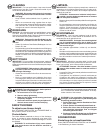
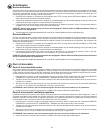
6. REMOVE AUGER BELT (H) from around pulley (E).
7. RELIEVE TENSION ON TRACTION DRIVE BELT IDLER (J) and remove
traction drive belt (K) from around pulleys.
HINT: Insert a 3/8" drive ratchet (in the “ON” position) into the square hole in
idler arm (J) and rotate ratchet clockwise to relieve tension.
E
D
B
A
H
J
K
M
2
1
F
L