


ENGLISH - 5
CAUTION! Wear heavy gloves of the
approved type!
There are two possible cutting procedures with
this machine:
1 Horizontal
2 Vertical
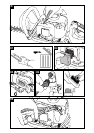
ONLY FOR MODELS WITH ADJUSTABLE
HANDLE
• The rear grip can only be adjusted in one of the
3 fixed positions: 0°, 90°, 180°.
• Adjust the rear grip depending on the type of
cutting (horizontal or vertical) that you have to
do so as to have full control of the hedge trim-
mer and an ergonomically correct position for
any cutting conditions.
• To adjust the grip, pull the release knob (E) all
the way in the direction of the arrow.
• Turn the grip slightly in the desired direction and
let go of the release knob (E).
• Complete rotation to the desired position (0°,
90° or 180° degrees), you will hear a click when
the grip is in place, and the release knob
returns automatically to its original position.
• To ascertain that the grip is correctly locked in
place, try to turn it and make sure it stays
locked in the position in which you have set it. If
it moves, repeat the operation of adjustment
and locking again.
CAUTION! Do not start the machine for
any reason without the certainty that the
release knob (E), has returned to its original
position with the grip correctly locked.
CAUTION! Before using the machine,
make sure the rear grip is firmly locked in
one of the proper positions so as to prevent
accidents.
CAUTION! If the grip does not remain
locked in one of the three positions, take
the machine to an Authorized Service Center.
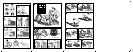
1 The horizontal cutting position is used to even
the tops of bushes, shrubs and hedges.
• Always cut from right to left.
• Never use the hedge trimmer above shoulder
height.
2 The vertical cutting procedure is used to trim
the sides of shrubs, bushes and hedges.
• Always cut upward from the bottom.
• Hold the machine with both hands.
• Press the trigger of the butterfly valve all the
way during cutting operations.
• When you have finished, release the trigger on
the butterfly valve and wait for the engine to
idle; the blade should stop.
• Move on to the next section.
• After reaching the next section and taking a sta-
ble standing position, resume working by press-
ing the trigger on the butterfly valve all the way
down.
E. Cutting procedure
• Clean the area around the fuel cap before
removing it, to prevent any impurities from con-
taminating the fuel.
• Take the cap off the fuel container carefully.
Unscrew the cap on the fuel tank and fill it with
the necessary quality, using a funnel.
• Take care not to spill any fuel.
• After filling the tank, screw the cap on tightly.
CAUTION! If you spill any fuel, wipe it off
the machine. If you have spilt it on your-
self, change your clothes at once. Avoid con-
tact with the skin or eyes.
CAUTION! The muffler gets very hot dur-
ing use and remains hot for some time
after switching off the engine. This also
applies at idle speed. Take every precaution to
reduce the fire hazard, especially in the pres-
ence of inflammable materials or gas.
FUEL STORAGE
• Gasoline is highly inflammable.
• Before going near any type of fuel, put out your
cigarette, pipe or cigar.
• Store the fuel in a cool, well-ventilated place, in
an approved fuel storage container.
• Never store the engine with fuel in the tank in a
poorly ventilated place where the fumes pro-
duced by the gasoline could propagate and
reach a fire, candle, burner or furnace pilot light,
water heater, dryer, etc.
• The fumes produced by the fuel can cause an
explosion or fire.
• Never store excessive quantities of fuel.
• To prevent problems in starting the engine
again, we recommend that you never let the
machine run completely out of fuel.