


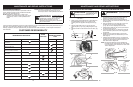


TROUBLESHOOTING
NOTE: For repairs beyond the minor adjustments listed above, contact your nearest Sears Parts & Repair center at
(1-800-4-MY-HOME®) or other qualified service dealer for an adjustment.
CAUSE ACTION
1. Incorrectly gapped spark plug 1. Clean/gap or replace plug
2. Plugged spark ar
restor 2. Clean or replace spark arrestor
3. Dir
ty air filter 3. Clean or replace air filter
CAUSE ACTION
1. Incorrect carburetor mixture adjustment setting 1. Have carburetor adjusted by a Sears or other
qualified service dealer
2. Old or improperly mixed fuel 2. Drain gas tank (see Storage)/add fresh fuel mixture
3. Air filter is plugged
3. Replace or clean the air filter
4. Fouled spark plug 4. Replace or clean the spark plug
CAUSE ACTION
1. Incorrect starting procedures 1. Follow instructions in the Starting/Stopping section
2. Incor
rect carburetor mixture adjustment setting 2. Have carburetor adjusted by a Sears or other
qualified service dealer
3. Fouled spark plug 3. Clean/gap or replace plug
4. Empty fuel tank 4. Fill fuel tank with properly mixed fuel
5. Primer bulb was not pressed enough 5. Press primer bulb fully and slowly 10 times
UNIT WON’T START OR STARTS BUT WILL NOT RUN
UNIT STARTS, BUT ENGINE HAS LOW POWER
ENGINE HESITATES
NO POWER UNDER LOAD
CAUSE ACTION
1. Fuel filter is plugged 1. Replace the fuel filter
2. Incorrect lever position 2. Move to Position 3
3. Dirty spark arrestor screen 3. Replace spark arrestor screen
4. Dirty air filter 4. Remove, clean and reinstall filter
5. Incorrect carburetor mixture adjustment setting 5. Have carburetor adjusted by a Sears or other
qualified service dealer
CAUSE ACTION
1. Incorrect carburetor mixture adjustment setting 1. Have carburetor adjusted by a Sears or other
qualified service dealer
2. Air filter is plugged 2. Replace or clean the air filter
3. Old or improperly mixed fuel 3. Drain gas tank/add fresh fuel mixture
RUNS ERRATICALLY
CAUSE ACTION
1. Incorrect carburetor mixture adjustment setting 1. Have carburetor adjusted by a Sears or other
qualified ser
vice dealer
2. Incorrect fuel mixture 2. Use properly mixed fuel (40:1 mixture)
SMOKES EXCESSIVELY
22
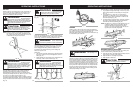
GUIDE BAR MAINTENANCE:
Most guide bar problems can be prevented merely by
keeping the chain saw well maintained.
Insufficient guide bar lubrication and operating the saw with
chain that is too tight will contribute to rapid bar wear.
To help minimize bar wear, the following guide bar mainte-
nance procedures are recommended.
BAR WEAR - Turn guide bar frequently at regular intervals
(for example, after 5 hours of use), to ensure even wear on
top and bottom of bar.
BAR GROOVES (B) Bar grooves (or rails which support
and carry the chain) should be cleaned if saw has been
used heavily or if saw chain appears dirty. Rails should
always be cleaned every time saw chain is removed.(fig.
38)
OIL PASSAGES (A) Oil passages on the bar should be
cleaned to ensure proper lubrication of the bar and chain
during operation. This can be done using a soft wir
e small
enough to insert into the oil discharge hole.(fig. 38)
NOTE: The condition of the oil passages can be easily
checked. If the passages are clear, the chain will
automatically give off a spray of oil within seconds
of starting the saw. Your saw is equipped with an
automatic oiler system.
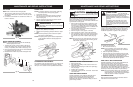
CHAIN MAINTENANCE
Chain T
ension
Check the chain tension frequently and adjust as often as
necessary to keep the chain snug on the bar, but loose
enough to be pulled around by hand.
Breaking in a New Saw Chain
A new chain and bar will need chain readjustment after as
few as 5 cuts. This is normal during the break-in period,
and the inter
val between futur
e adjustments will begin to
lengthen quickly
.
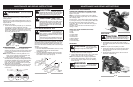
MAINTENANCE AND REPAIR INSTRUCTIONS
Never have mor
e
than 3 links r
emoved
from a loop of chain. This could cause dam-
age to the spr
ocket.
WARNING:
INERTIA CHAIN BRAKE® ACTION
NOTE: THIS SAW IS EQUIPPED WITH AN INERTIA
CHAIN BRAKE. IF THE SAW KICKS BACK WHILE
IN USE, THE INERTIA OF THE MOVING SAW
WILL ACTIVATE THE BRAKE. A BRAKE BAND
AROUND THE CLUTCH DRUM ACTIVATES AND
STOPS THE MOVING CHAIN.
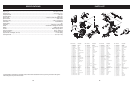
Bar Length Drive Links
Sears Part #
18” Bar 72 DL
36514
CHAIN REPLACEMENT INFORMATION
Chain Lubrication
Always make sure the automatic oiler system is working
pr
operly. Keep the oil reservoir filled with Chain, Bar and
Sprocket Oil.
Adequate lubrication of the bar and chain during cutting oper-
ations is essential to minimize friction with the guide bar.
Never starve the bar and chain of lubricating oil. Running
the saw dry or with too little oil will decrease cutting effi-
ciency, shorten saw chain life, cause rapid dulling of chain,
and lead to excessive wear of bar from overheating. Too
little oil is evidenced by smoke or bar discoloration.
Chain Sharpening
Chain sharpening requires special tools to ensure that cut-
ters are sharpened at the correct angle and depth. For the
inexperienced chain saw user, we recommend that the
saw chain be professionally sharpened by the nearest
Authorized Ser
vice Center. If you feel comfortable sharp-
ening your own saw chain, special tools are available from
your Authorized Service Center. Use 3/16” round file to
sharpen this chain.
21
B
A
Fig. 38