


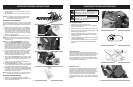


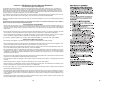

AIR FILTER
1. Remove the top cover (A) by loosening the cover
r
etaining screws. Cover will lift off (Fig. 31).
2. Clean air filter. Wash filter in clean, warm, soapy water.
Rinse in clear
, cool water
. Air dr
y completely
.
NOTE: It is advisable to have a supply of spare filters.
3.
Install air filter
. Install engine / air filter cover
. Make
sure cover fits properly. Tighten the cover retaining
screws securely.
FUEL FILTER
To empty fuel tank before removing fuel filter.
1. Pull fuel filter (A) out of tank with a bent wire (B) or
long needle nosed pliers. Disconnect filter and discard
(Fig. 32).
NOTE: Do not pull hose completely out of tank.
2. Install a new fuel filter on hose and push hose and fil-
ter assembly back into tank so filter is positioned in
fr
ont right corner.
3. Fill tank with fresh fuel/oil mixture. See Oil and Fuel
Information.
Install fuel cap.
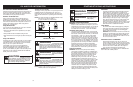
MAINTENANCE AND REPAIR INSTRUCTIONS
Never operate saw
without the air filter.
Dust and dirt wil be drawn into engine and
damage it. Keep the air filter clean.
CAUTION:
To avoid serious per-
sonal injur
y, always
turn your unit off and allow it to cool before
you clean or service it.
WARNING:
Never operate saw
without the fuel filter.
The fuel filter should be replaced after each 10
hours of use. Drain fuel tank before changing.
CAUTION:
A
B
Fig. 31
Fig. 32
B
A
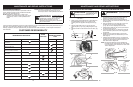
MAINTENANCE REQUIREMENTS
CHECK FOR DAMAGED OR WORN PARTS
Check a Sears Service Center for replacement of dam-
aged or worn parts.
NOTE: It is normal for a small amount of oil to appear
under the saw after the engine stops. Do not confuse this
with a leaking oil tank.
• STOP Switch - Ensure STOP switch functions properly
by moving the switch up to the STOP position. Make sure
the engine stops; then restart engine and continue.
• Fuel Tank - Do not use saw if fuel tank shows signs of
damage or leaks.
• Oil Tank - Do not use saw if oil tank shows signs of
damage or leaks.
CHECK FOR LOOSE FASTENERS AND PARTS
• Chain Brake Nuts
• Chain
• Muffler
• Cylinder Shield
• Air Filter cover
• Handle Screws
• Vibration Mounts
• Starter Housing
• Front Hand Guard
18
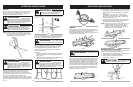
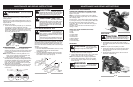
SAW CHAIN TENSION ADJUSTMENT
Proper tension of saw chain is extremely important and
must be checked before starting, as well as during any
cutting operation.
Taking the time to make needed adjustments to the saw
chain will result in improved cutting performance and pro-
longed chain life.
To adjust the saw chain:
1. Loosen the bar retaining nut(s) (B, Fig. 27). Hold nose
of guide bar up and turn adjustment screw (D)
CLOCKWISE to increase chain tension. Turning screw
COUNTERCLOCKWISE will decrease amount of ten-
sion on chain. Ensure the chain fits snugly all the way
around the guide bar (Fig. 28).
Always use pr
otective
gloves when handling
the saw chain.
WARNING:
A
C
B
Fig. 29
2. After making adjustment, and while still holding nose
of bar in the uppermost position, tighten the bar
retaining nuts securely. Chain has proper tension when
it has a snug fit all around and can be pulled around
by gloved hand.
NOTE: If chain is difficult to rotate on guide bar or if it
binds, too much tension has been applied. This
requires minor adjustment as follows:
A. Loosen the bar retaining nuts so they are hand tight.
Decrease tension by turning the bar adjustment screw
COUNTERCLOCKWISE slowly
. Move chain back and
for
th on bar
. Continue to adjust until chain r
otates
freely, but fits snugly. Increase tension by turning bar
adjustment screw CLOCKWISE.
B. When saw chain has proper tension, hold nose of bar
in uppermost position and tighten the bar retaining
nuts secur
ely
.
A new saw chain
stretches, requiring
adjustment after as few as 5 cuts. This is normal
with a new chain, and the interval between
future adjustments will lengthen quickly.
CAUTION:
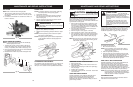
If saw chain is TOO
LOOSE or TOO
TIGHT, the sprocket, bar, chain, and crank-
shaft bearings will wear more rapidly. Study
Fig. 29 for information concerning correct
cold tension (A), correct warm tension (B),
and as a guide for when saw chain needs
adjustment (C).
CAUTION:
Fig. 30
CHAIN BRAKE MECHANICAL TEST
Your chain saw is equipped with a Chain Brake® that
reduces possibility of injury due to kickback. The brake is
activated if pressure is applied against brake lever when,
as in the event of kickback, operator’s hand strikes the
lever. When the brake is activated, chain movement stops
abruptly.
To Test the
Chain Brake®:
1. The Chain Brake® is DISENGAGED (chain can move)
when BRAKE LEVER IS PULLED BACK AND
LOCKED (A, Fig. 30).
2. The
Chain Brake® is ENGAGED (chain is stopped)
when brake lever is in forward position. You should
not be able to move chain (B, Fig. 30).
The purpose of the
Chain Brake® is to
reduce the possibility of injury due to kick-
back; however, it cannot provide the intend-
ed measure of protection if the saw is oper-
ated carelessly.
Always test the Chain Brake® before using
your saw and periodically while on the job.
WARNING:
A
B
MAINTENANCE AND REPAIR INSTRUCTIONS
D
Fig. 28
17