


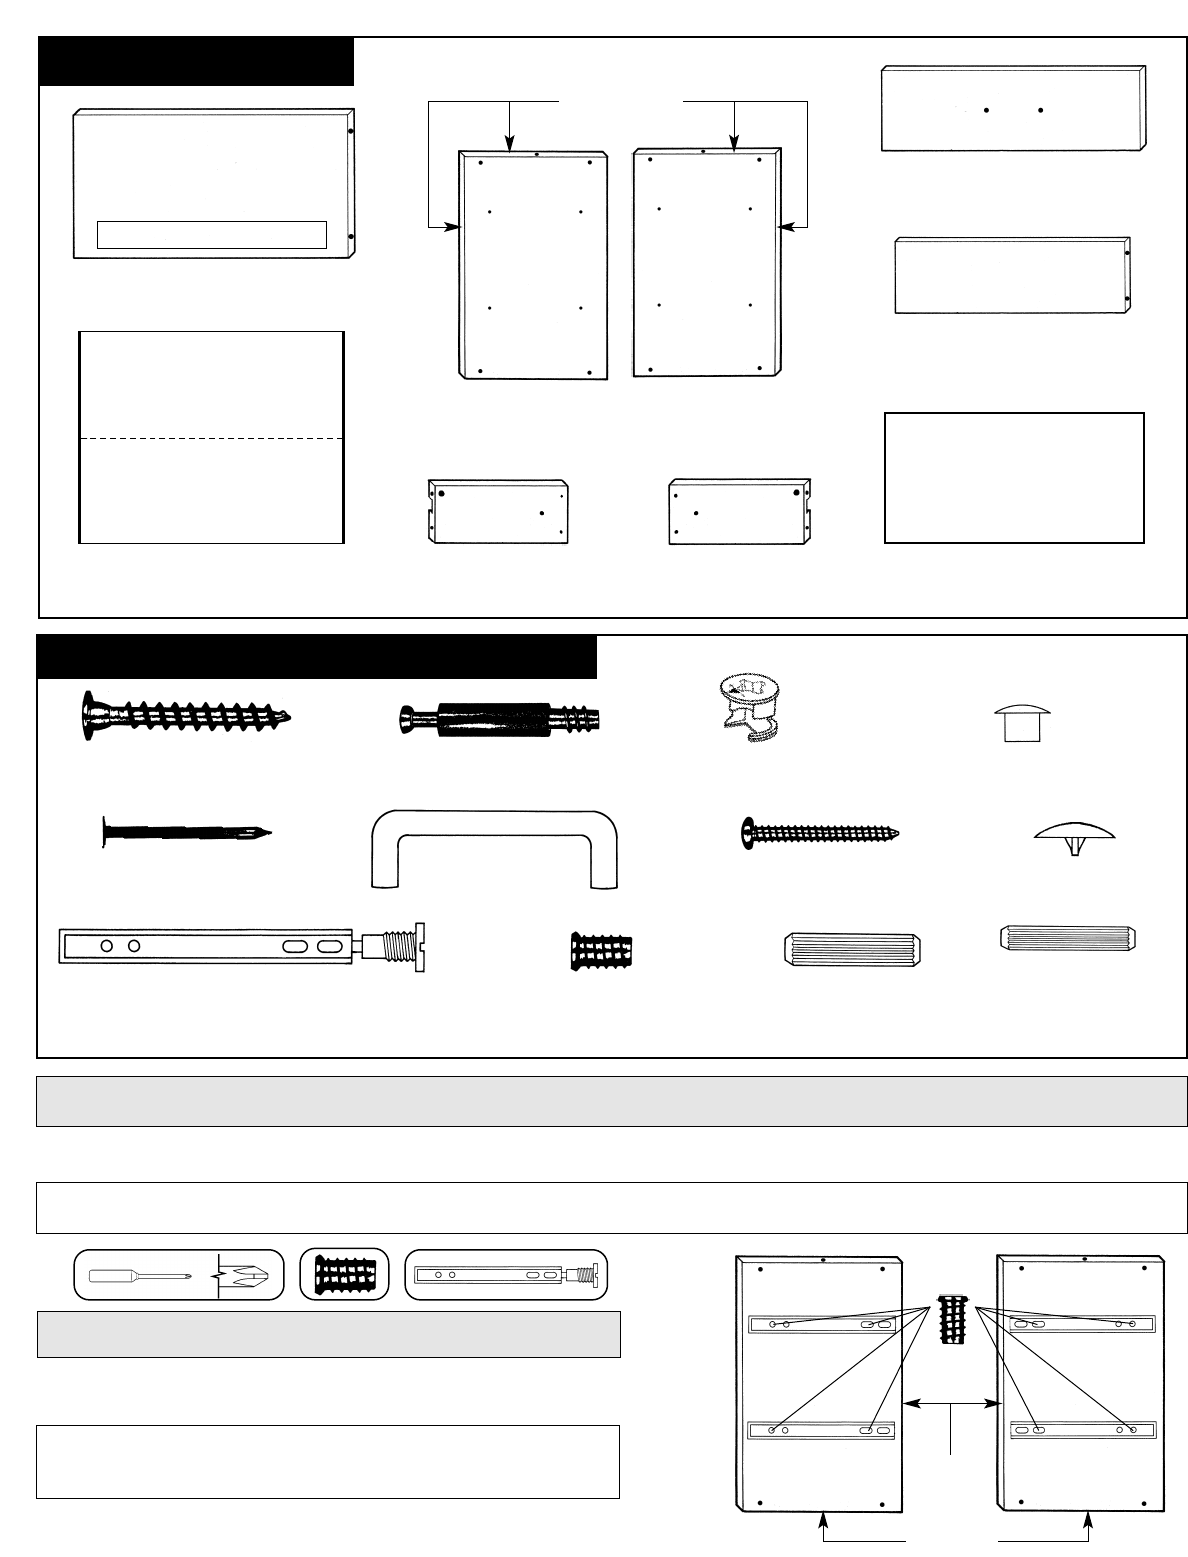
UNFINISHED
EDGE
REBORDE
NON FINIS
BORDES NO
ACABADOS
HARDWARE / QUINCAILLERIE / HERRAJES
1" HANDLE SCREW (4)
VIS DE POIGNÉE DE 1 PO
TORNILLO DE 1" DE LA MANIJA
SMALL CAM (4)
PETITE CAME
LEVA PEQUEÑA
COMMON NAIL
CLOU À BOIS
CLAVO COMUN
LARGE WOODEN DOWEL (4)
GROSSE CHEVILLE EN BOIS
PASADOR DE MADERA
GRANDE
SMALL WOODEN STACKING
DOWEL (2)
PETITE CHEVILLE EN BOIS
PASADOR DE MADERAPE
PEQUEÑO
CAM POST (4)
TIGE À CAME
POSTES DE LA LEVA
COVER CAP (8)
COUVRE-VIS
CUBRETORNILLOS
DRAWER GLIDE SCREWS (8)
VIS DE COULISSE DE TIROIR
TORNILLOS DE LA CORREDERS
DEL CAJON
1 1/2" ASSEMBLY SCREW (16)
VIS DE MONTAGE DE 1-1/2 PO
TORNILLO DE MONTAJE
DRAWER HANDLE (2)
POIGNÉE DE TIROIR
MANIJA DEL CAJON
DRAWER GLIDE (4)
COULISSE DE TIROIR
CORREDERA DE CAJON
DRAWER STOP (4)
BUTÉE DE TORIOR
TOPE DE CAJON
PARTS
/
PIÈCES/PIEZAS
LEFT SIDE (1)
MONTANT GAUCHE
MONTANTE IZQUIERDO
RIGHT SIDE (1)
MONTANT DROIT
MONTANTE DERECHO
FIXED SHELF (2)
TABLETTE FIXE
ESTANTE FIJO
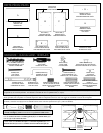
Prenez tout d'abord quelques moments pour vous familiariser avec les pièces et la quincaillerie avant de monter ce meuble. Les lettres n'apparaissent pas sur les
pièces; cependant, elles sont faciles à reconnaître d'après leur taille et la disposition des trous. Nous vous suggérons d'assembler le tout sur de la moquette.
Antes de armar el estante familiarícese con las piezas y con la ferretería.Las letras no aparecen en las piezas.Sin embargo,todas las piezas son fácilmente reconocibles por
su tamaño y ubicación de los agujeros.Se recomienda armar el estante sobre una superficie suave (por ej.sobre una alfombra).
Take a few moments to familiarize yourself with the actual parts and hardware prior to assembling the unit.Letters do not appear on parts,however,all parts are clearly
recognizable by size and hole placement. It is advisable to assemble the unit on a padded surface (i.e.Carpet).
B
C
NOTE: Both fixed shelves are identical.
FINISHED EDGE
REBORDE FINIS
BORDES ADABADOS
A
BACK PANEL (1)
PANNEAU ARRIÉRE
PANEL POSTERIOR
D
LEFT DRAWER SIDE (2)
CÔTÉ DE TIROIR GAUCHE
LADO IZQUIERDO DEL CAJÓN
RIGHT DRAWER SIDE (2)
CÔTÉ DE TOROIR DROIT
LADO DERECHO DEL CAJÓN
DRAWER FRONT (2)
DEVANT DE TIROIR
PIEAZ DELANTERA DEL CAJÓN
DRAWER BACK (2)
ARRIÈRE DU TIROIR
PIEAZ POSTERIOR
DEL CAJÓN
DRAWER BOTTOM (2)
DESSOUS DU TIROIR
INFERIOR DEL CAJÓN
H
G
E
F
I
DOWEL HOLE PLUG (2)
BOUCHON DE TROU DE CHEVILLE
TAPÓN DEL AGUJERO DE LA CLAVIJA
1
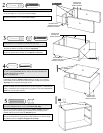
Snap Drawer Stops off ends of Drawer Glides and set aside. Attach Drawer Glides
to Left (B) and Right (C) Sides in holes shown using (8) Drawer Glide Screws.
Separe los topes del cajón de los extremos de las correderas del cajón y colóquelos
a un lado.Instale las correderas del cajón en el montante izquierdo (B) y en el
montante derecho (D) usando los tornillos de lasl correderal del cajón (8).
Détachez les butées de tiroir de l'extrémité des coulisses de tiroir de conservez-les.
Fixez les coulisses de tirior au montant gauche (B) at au montant droit (C) à
l'aide des (8) vis de coulisse de tiroir.
B
C