45 Series Rotary Tiller
15
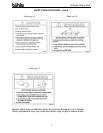
FIELD OPERATION - cont'd.
7. Align the unit with the working area.
8. Starting machine:
a. Run the engine at low idle.
b. Slowly engage the PTO control to start the machine.
c. Slowly bring the engine to the rated PTO speed. Never exceed rated
speed.
d. Lower the machine to the ground and proceed down the field.
9. Stopping machine:
a. Slowly decrease engine speed to low idle.
b. Raise machine out of the ground.
c. Disengage PTO clutch slowly.
CAUTION: Place all controls in neutral, lower machine, stop engine, set
park brake remove ignition key and wait for all moving parts to stop before
dismounting.
10. Ground Speed:
Travel speed can vary between 2 and 5 mph (3 and 8 km/h) depending on the
soil and terrain conditions. It is the responsibility of the operator to note the
condition of the job being done and set the speed to obtain a quality tilling job
and maintain control of the machine.
The speed can be increased to optimize tilling.
Decrease speed if you want the soil worked to a finer texture.
11. Operating hints:
a. Determine the moisture content of the soil before starting. Soil that is too
wet will "ball-up" in the rotor blades making tilling impossible. Sandy soils
normally can be worked better than heavy clay or loam soils. It is the
responsibility of the operator to determine the soil type and moisture
content before starting. It may be necessary to wait for the soil to dry out
before starting to work.
b. Set the length of the Top Link to obtain the quality of the job desired
without needlessly using power and fuel in churning the soil. Use the
condition of the seedbed as your guide.
c. When tilling hard or compacted soils, it is recommended that two passes
be used when working. Use the Depth Gauge Shoes on each side of the
frame to adjust the tilling depth of the machine. The second pass should
be made at an angle to the first to give a consistent job and minimize
compaction.
d. Always remove heavy crop cover, all grass and weeds, before starting to
prevent rotor plugging.


