


47
Troubleshooting, Adjustment & Repair
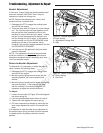
Hydraulic Pump Drive Belt Replacment
1. Park the tractor on a smooth, level surface such
as a concrete floor. Disengage the PTO, engage
the parking brake, turn off the engine, and remove
the ignition key.
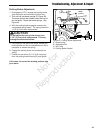
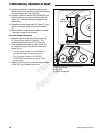
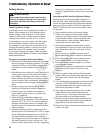
2. Remove the hardware (A, Figure 51) that secures
the pump guard plate (B) to the frame. Remove
the pump guard plate from the machine.
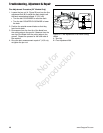
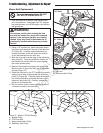
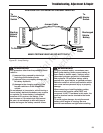
3. Using a 1/2” breaker bar, place the square end in
the square hole located in the end of the idler arm
(A, Figure 52). Carefully rotate the breaker bar
CLOCKWISE, which will relieve the tension on the
belt exerted from the idler arm.
4. Slide the drive belt over the edge of the right
pump drive pulley (C). Carefully release the
tension on the breaker bar.
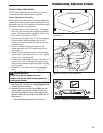
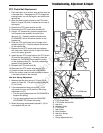
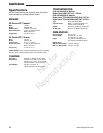
5. Loosen and remove the two drive shaft collar bolts
(A, Figure 53) from the drive shaft universal joint
(B).
6. Pull the drive shaft universal away from the drive
shaft spindle (D) and pivot out of the way.
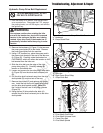
7. Remove the old belt (E) and replace with a new
one. Install the belt on the left pump drive pulley
and the drive shaft spindle pulley. Make sure
the V-side of the belt runs in the pulley grooves
(Figure 53).
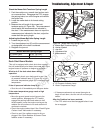
8. Using the two (2) drive shaft collar bolts (A)
reinstall the drive shaft universal joint to the drive
shaft spindle.
A
B
Figure 52. Removing the Tension on the Belt
A. Idler Arm
B. Right Pump Drive Pulley
C. Pump Drive Belt
C
To avoid damaging belts, DO NOT
PRY BELTS OVER PULLEYS.
WARNING
Use extreme caution when rotating the idler
arm with the breaker bar, due to the increased
tension in the spring as the idler arm is being
rotated. Injury may result if the breaker bar is
prematurely released while the spring is under
tension.
Figure 53. Removing the Spindle Shaft
A. Drive Shaft Collar Bolts
B. Drive Shaft Universal Joint
C. Pump Drive Belt
D. Drive Shaft Spindle
Figure 51. Remove the Pump Drive Belt Guard
A. Hardware
B. Pump Guard Plate
A
B
A
A
B
D
C
Not for
Reproduction