


GB
3
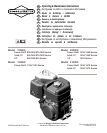
This engine is certified to operate on gasoline. Exhaust Emission Control System:
EM (Engine Modifications).
Do not use gasoline which contains Methanol. Do not mix oil with gasoline.
Adding Fuel
Clean around fuel fill before removing cap. Fill tank to approximately 1-1/2 inches
below top of neck to allow for fuel expansion. Be careful not to overfill.
Before refueling, allow engine to cool 2 minutes.
WARNING
STARTING
CAUTION: Some engines may be equipped with Oil Gard. The Oil Gard is
intended to warn the operator that the engine is low on oil. Always check oil level
before starting. Engine damage may occur if the oil level is not properly
maintained and will void warranty coverage. If the engine will not start, has
stopped running and/or a light flickers in the stop switch, add oil (see oil
procedure Fig. 2).
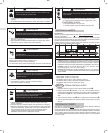
BEFORE STARTING THE ENGINE
Fig. 3
1. Add oil and fuel as instructed in this manual.
2. Move choke control
Ê to CHOKE position.
3. Move throttle control
Ë to FAST position.
4. Turn fuel shut-off valve
Ì ON, if equipped.
5. Move stop control
Í to ON position, if equipped.
Note: OIL GARD light in rocker stop switch
Í, if equipped, warns of low oil level.
Light will flicker and engine will not start, or restart. Oil must be added. Fill to FULL
mark on dipstick or overflowing at oil filler plug. Do not over fill. OIL GARD, however,
will not stop a running engine if the engine runs low on oil.
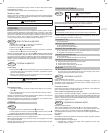
STARTING THE ENGINE
Fig. 4
Rewind Starter
1. Grasp rope handle Ê and pull slowly until resistance is felt. Then pull cord
rapidly to overcome compression, prevent kickback and start engine.
2. Repeat if necessary with choke in RUN position and throttle in FAST. When
engine starts, operate in FAST position.
WARNING
Rapid retraction of starter cord (kickback) will pull hand and arm toward
engine faster than you can let go.
Electric Starter
1. On engines equipped with 12 volt starting systems, turn key to START
position
Ë.
2. Repeat if necessary with throttle control in FAST position. When engine
starts, operate in FAST position.
Note: If equipment manufacturer has supplied battery, charge it before trying to start
engine, as equipment manufacturer recommends.
Note: Use short starting cycles (15 sec. per minute) to prolong starter life. Extended
cranking can damage starter motor.
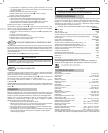
STOPPING
Fig. 5
1. Move throttle control lever to IDLE or SLOW position Ê, if equipped.
2. Then move stop control to OFF position
Ë or turn key to OFF Ì.
3. Close fuel shut-off valve
Í.
CAUTION: DO NOT move choke control to CHOKE position to stop engine.
Backfire or engine damage may occur.
Note: Always remove key from switch when equipment is not in use or left unat-
tended.
Note: When engine is transported, close fuel shut-off valve to prevent leakage.
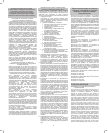
MAINTENANCE
Fig. 6
To prevent accidental starting, remove spark plug
wire Ê and keep it away from spark plug before
servicing.
WARNING
Regular maintenance improves performance and extends engine life. More
frequent service is required when operating in adverse conditions.
Do not strike the flywheel with hammer or hard object. If done, the flywheel
may shatter during operation.
Do not tamper with links or other parts to increase engine speed.
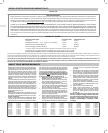
WARNING
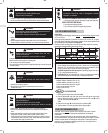
Follow the hourly or calendar intervals, whichever occur first. More frequent
service is required when operating in adverse conditions noted below.
First 5 Hours
D Change oil
Every 8 Hours or Daily
D Check oil level
D Clean around muffler
Every 25 Hours or Every Season
D Change oil if operating under heavy load or high ambient temperature
D Service air cleaner pre-cleaner *
Every 50 Hours or Every Season
D Change oil
D Clean and inspect spark arrester, if equipped
Every 100 Hours or Every Season
D Service oil foam air cleaner or cartridge*
D Clean/replace spark plug
D Change gear reduction oil, if equipped
D Clean cooling system*
Every Season
D Check valve clearance
* Clean more often under dusty conditions, or when airborne debris is present or after
prolonged operation cutting tall, dry grass.
OIL SERVICEFig. 7
Check oil level regularly.
Be sure correct oil level is maintained. Check every 8 hours or daily, before starting
engine. See oil filling procedure under Oil Recommendations Do not over-fill.
Changing Oil
Change oil after first 5 hours of operation. Change oil while engine is warm. Refill
with new oil of recommended SAE viscosity grade. (see fig. 2)
Changing Oil in Gear Reduction, if equipped
Remove oil fill plug Ê and oil level plug Ë. Drain oil every 100 hours of operation
or every season. To refill, pour SAE 30 oil into oil fill hole until it runs out level
check hole. Replace both plugs. Oil fill plug has a vent hole Ì and must be
installed on top of gear case cover.
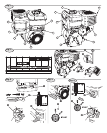
AIR CLEANER MAINTENANCE
Fig. 8
Dual Element Air Cleaners
Replace pre-cleaner Ê and/or cartridge Ë if very dirty or damaged.
To service pre-cleaner, if equipped, wash in liquid detergent and water. Squeeze
dry in a clean cloth and allow to dry thoroughly. DO NOT oil pre-cleaner.
To service cartridge, clean by tapping gently on a flat surface. DO NOT oil
cartridge.
CAUTION
:
Do not use pressurized air or solvents to clean. Pressurized air can damage filter;
solvents will dissolve filter.