


TOOLS YOU WILL NEED
CHECK BOX FOR THESE CONTENTS
PLEASE READ COMPLETELY BEFORE YOU BEGIN ASSEMBLY
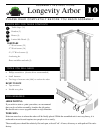
Longevity Arbor
ASSEMBLY INSTRUCTIONS
10
PRELIMINARIES
Trellis Caps (16)
Headers (2)
Braces (4)
Lattice Side Panels (2)
1
2
3
4
• Phillips screwdriver (electric driver recommended)
•
Small hammer
•
Two bags of concrete mix (60#) to anchor the arbor
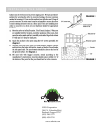
If you wish to stain or paint your arbor, we recommend
that you do so before assembly, it makes the job easier.
Be careful not to cover up guide marks on top of headers
ARBOR PAINTING:
HANDY TO HAVE
• Tape measure
•
Needle nose pliers
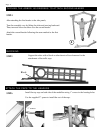
WORK AREA
Select an area close to where the arbor will be finally placed. While the assembled unit is not very heavy, it is
awkward to move far and requires two people to do so easily.
The assembly area should be relatively flat and open, at least 8’x6’. A lawn, driveway or wide path will be satis-
factory.
1
2
4
3
HARDWARE
- 1” Wood screws (32)
- 2” Wood screws (16)
- 2 1/2” Wood screws (8)
- Anchoring kit.
- Brass medallion and nails (2)