


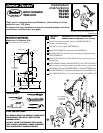

Dimensions are for reference.
Thank you for selecting American-Standard...the benchmark of fine
quality for over 100 years.
To ensure that your installation proceeds smoothly--please read these
instructions carefully before you begin.
ROUGHING-IN DIMENSIONS
Installation for Bath/Shower,
Shower only, or Valve only Trim.
Certified to comply with ANSI A112.18.1
M968289
Installation
Instructions
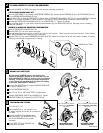
1
INSTALL
TRIM
When finished tiling the wall, remove PLASTER GUARD (A)
and turn off water supply.
Push CAP (1) over VALVE CARTRIDGE (2).
Mount ESCUTCHEON (3) to valve body with SCREWS (4).
Push DIAL PLATE (9) over CAP (1) and into the three alignment holes
in ESCUTCHEON (3).
Remove PIPE CAP (5) and PIPE PLUG (9) from shower pipe and
tub filler pipe.
Install SHOWER ARM (6), SHOWER HEAD (7) and TUB FILLER SPOUT
(8) by threading onto pipe nipples using teflon tape or pipe sealant.
Install HANDLE (10) onto CARTRIDGE STEM (11). Tighten SET SCREW (12)
with HEX WRENCH (13) supplied with fitting to secure HANDLE (10).
Push INDEX BUTTON (14) into set screw opening in HANDLE (10).
CAUTION: Protect finish on SHOWER ARM,
SHOWER HEAD and TUB SPOUT when installing.
BATH/SHOWER
TRIM KITS
T6280
T6281
T6282
FINISHED WALL
4"
BOTTOM OF TUB
74" FOR HEAD
CLEARANCE
5-1/8" REF.
7-1/2" REF.
18" OPTIONAL
5-5/8" REF.
1/2" NPT
1/2" NPT
7-1/8"
1" MIN.
TOP OF TUB RIM
by
COLLECTION
™
“”
THE
CARE INSTRUCTIONS:
DO: SIMPLY RINSE THE PRODUCT CLEAN WITH
CLEAR WATER. DRY WITH A SOFT COTTON
FLANNEL CLOTH.
DO NOT: CLEAN THE PRODUCT WITH SOAPS,
ACID, POLISH, ABRASIVES, HARSH CLEANERS,
OR A CLOTH WITH A COARSE SURFACE
Required Tools
Flat Blade Screwdriver
Adjustable Wrench
Channel Locks
Plumbers' Putty or Caulking
Phillips Screwdriver
6
7
3
1
11
9
2
A
5
8
9
4
10
(3) ALIGNMENT
HOLES FOR
DIAL PLATE
13
14
12