


Step 1 Set up your AeroGarden®
Reference your Quick Start Guide for instructions on setting up your
garden. If you no longer have your garden’s Quick Start Guide, you can
download the latest version at www.aerogardensupport.com. If you’re
replanting your garden, please refer to the “Replanting Your Garden” on
the back page of this guide.
• If your garden has a “plant select” feature, set it to the correct plant type.
Step 2 Water your AeroGarden
• Add cool tap water or puried water to the bowl to the ‘Fill to Here”
indicator. Do not use well or softened water.
• The AeroGarden has a low water level indicator, but we encourage you to
check the water level frequently and keep the bowl full.
Step 3 Plant your seed kit
Seed pod labels identify plant height.
• Herbs and Flowers: Place Tall plants in the back row, Medium plants
along the sides, and Short plants in the front.
• Vegetables: Place Seed Pods in each Front/Side opening and in a center back
opening. Put plant spacers in the remaining openings. In 3-Pod gardens,
place Seed Pod in any opening.
• If plants are all the same height, location of Seed Pod does not matter.
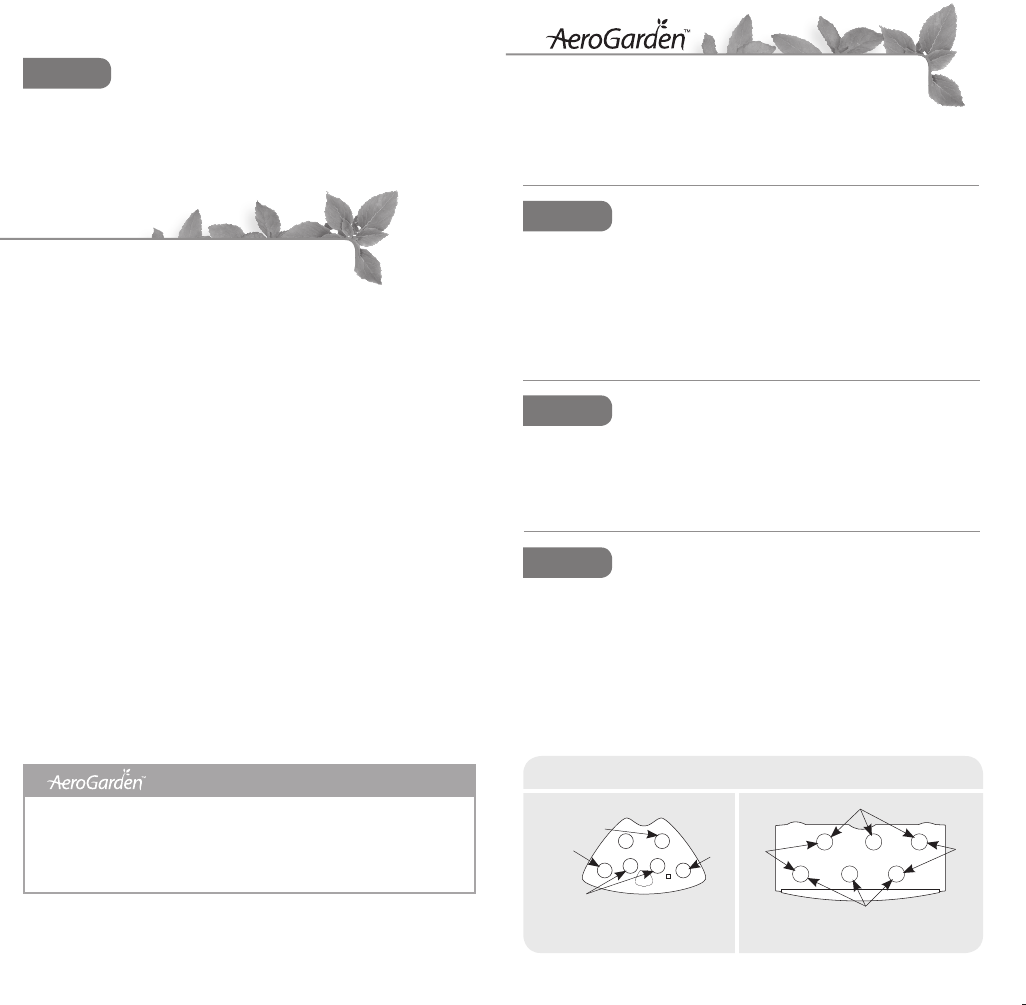
Grow Surface Examples
6-Pod Space•Saver
Front
Side
Front
Side
Front Center
Back
AeroGrow International, Inc., P.O. Box 18450, Boulder, CO 80308-1450
www.aerogrow.com
This warranty covers defects in materials, workmanship, germination and growth for one year
from date of purchase; void if used in a growing system other than an AeroGarden. AeroGrow will
replace a non-germinating Seed Pod with a Seed Pod AeroGrows choosing. To return a product see
www.aerogardensupport.com under “All Other Questions” section. You may have other legal
rights that vary from state to state.
SEED KIT LIMITED WARRANTY
Replanting your AeroGarden
TM
If you have already grown a seed kit in your AeroGarden, it is important to
restart the nutrient timer before planting a new seed kit.
For 6- and 7-Pod AeroGarden models:
1. Press and HOLD “Reset” button until “Add Nutrients” light begins to blink:
• 6 seconds/Space•Saver 6 models
• 9 seconds/all other 6- and 7-Pod models
2. Release “Reset” button and “Add Nutrients” light will go o. Nutrient timer
is now reset.
For 3-Pod AeroGarden models:
1. Press and HOLD button until “Add Nutrient” light begins to blink (about 6
seconds).
2. Release button then quickly press and release button again. “Add Nutrient”
light will blink once and timer is now reset.
Remember to...
• Sanitize your AeroGarden before replanting (see “Prepare for Your Next
Garden” in your model’s Quick Start Guide). If you no longer have your
Quick Start Guide, you can nd one at www.aerogardensupport.com.
• Set your Lamp Hood to the lowest position when starting a new garden.
• Replace Grow Bulb(s) after 6 months of use. Bulbs can be ordered at
www.aerogrow.com, by calling 1-800-476-9669 or from your retailer.
Front
Back
Side
Side
6-Pod
Continued on next page.
• It is best to replace Grow Bulb(s) every 6 months. As bulbs dim, plants
may “stretch” looking for light, or not ower or fruit as vigorously.
• We are always introducing new Seed Kits! Check our website to see
what you want to grow next.
Step 7 Reorder
©2010 AeroGrow International, Inc. Item # 507320-0000
Continued from previous page
How to Plant Your Garden
Now AeroGardens are even greener. To save paper we’ve included an
abridged Tending & Harvesting Guide. To download a full Tending &
Harvesting Guide for your garden visit: www.aerogardensupport.com.